Wednesday, March 24, 2010

Brownie Bites


I normally don't get these types of mixes, but I had a coupon and thought I would try them out. They were totally cute and the perfect portion control. I know you could bake a regular batch of brownies in mini muffin cups (I have done it before myself) but this is great if you only want a dozen. You also have the option to only bake 6 if you want. This was perfect for a little family home evening treat, then I did not have them hanging around the counter the next day waiting for me to eat them! All you do is add water and portion it out in the little muffin pan they provide in the box. You spray them and the brownies totally pop out when cooled ten minutes. There are lots of things you could do with these (ideas on the box) but I frosted mine and topped with sprinkles. So very cute and delicious!


Monday, March 15, 2010

Taste a Rainbow Cupcakes


I made these for Family Home Evening treats. The best part was opening them up and seeing that it actually worked and the colors all lined up beautifully! They were also delicious!

Ingredients
White cake mix
Food coloring (red, orange, yellow, green, blue, and purple)
Baking cups
Whipped cream (optional)
Instructions

Prepare your favorite white cake mix, then divide the batter evenly among six small bowls. Using food coloring, dye each bowl of batter a rainbow color. I used gel colors for really bright colors.

Line 16 muffin pan wells with baking cups. (I was out of regular cupcake papers so I just sprayed my muffin pans well and they came out just fine). Evenly distribute the purple batter among the cups, then the blue, and so on, following the order shown. As you go, gently spread each layer of batter with the back of a spoon to cover the color underneath.
Bake the cupcakes according to your recipe directions. Before serving, top each cupcake with a whipped-cream cloud.

(This would be perfect in a Bundt pan- rainbow shape!)

Friday, March 12, 2010

Southwest Black Bean and Avocado Salad


This is a recipe from Jamie Deen, son of Paula Deen. I took this salad to Relief Society last night-- with a few changes. I doubled the lettuce, left out the Tabasco in the dressing, put the cheese in a bowl on the side (I just used cheddar/jack cheese instead of the papper jack), and made guacamole with three avocados and had that on the side with Mission Tortilla Strips. I would probably double the dressing next time. All that aside, here is the original recipe-- I love the combination of all these ingredients. They were meant to be together. This would also be great with marinated chicken breast strips on top. I put this together at the last minute before having to leave for Relief Society so, no picture. Thanks Gabi for cleaning up the kitchen! There was cilantro everywhere!

Ingredients:
1/2 cup freshly chopped cilantro leaves
1/4 cup extra-virgin olive oil
2 tablespoons freshly squeezed lime juice
2 or 3 dashes hot sauce (recommended: Tabasco)
4 cups chopped romaine lettuce
2 avocados, peeled and diced
2 cups fresh or frozen corn kernels, thawed and drained
2 (15-ounce) cans black beans, rinsed and drained
1 cup chopped cherry tomatoes
About 3/4 cup (3-ounces) grated pepper jack cheese
Kosher salt and freshly ground black pepper

Directions:
In a small bowl, whisk together the cilantro, oil, lime juice and hot sauce.

In a large serving bowl, add the lettuce, avocado, corn, beans, tomatoes, and cheese. Add the dressing and toss well. Season with salt and pepper, to taste, and serve.

Thursday, March 11, 2010

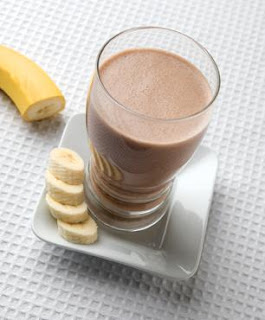
Peanut Butter and Banana Breakfast Shake


This was Gabrielle's breakfast this morning-- she has been wanting a "chocolate smoothie" for a long time now. She said how good it was about five times! I am always happy to find something she will eat happily.

I got this recipe in a little booklet I picked up somewhere. It is from the Midwest Dairy Association and Midwest Dairy Council. Their website is www.midwestdairy.com. Lots of good recipes and nutrition information. Check it out!


Ingredients:
1 cup of fat-free or 1% low-fat chocolate milk
1/2 cup frozen banana slices
1 tablespoon peanut butter
1/2 teaspoon vanilla extract
1/4 teaspoon ground cinnamon

Preparation:
Combine all ingredients in a blender; blend until smooth and creamy. Serve in tall glass or on-the-go drink container.

Nutritional Facts:
Nutritional Facts Per Serving:
Calories: 270
Total Fat: 9g
Saturated Fat: 2g
Cholesterol: 5mg
Sodium: 220mg
Carbohydrates: 35g
Dietary Fiber: 3g
Protein: 15g
Calcium: 35% Daily Value

Monday, March 8, 2010

Easy Apple Crisp


I made this easy apple crisp last night after pork chops for dinner. It just comes from pantry ingredients, so it's great when you get the idea in your head that you must have it soon!

Preheat the oven to 375°.

Pour 2 cans apple pie filling into an oval casserole dish. In a separate bowl combine 1 cup flour and 1 cup packed brown sugar.

With a pastry blender, cut in two sticks of very cold butter that you have first cut into smaller cubes. When the mixture resembles small - medium crumbs, stir in 1/2 cup quick cooking oats. I also add in some apple pie spice (or just cinnamon and/or nutmeg). Sprinkle the mixture over the apple pie filling in dish. Bake until bubbling and golden brown on top-- about 35 minutes.

Serve with vanilla ice cream of your choice. Send it over the top with caramel sauce.

(By the way, the original recipe for this is a peach crumble -- i just use it for the topping. It is from The Martha Stewart Cookbook-- Collected Recipes for Everyday. Thank you Martha!)

Thursday, March 4, 2010

Stuffed Pizza Rolls

I happened upon this recipe on the blog Our Best Bites. These are yummy! I made them for dinner last night with a salad. They would be great as appetizers, too. I will hopefully perfect the rolling up process next time I make them. I made them in my shallow mini muffin/appetizer pan. We dipped them in pizza sauce, too.

Here is the original post from the our best bites blog: www.ourbestbites.com/2009/06/stuffed-pizza-rolls.html

and here's some pictures of mine:


Monday, March 1, 2010

Honey Bun Cake


This is one of Jared's favorites! I made it Friday for his homecoming. It is possibly one of the sweetest things you'll ever taste. It has honey, brown sugar, and a powdered sugar glaze! I like to make the glaze with half and half or cream to take it over the edge. Can you believe some people eat this for breakfast or brunch? Here's the original recipe. The only thing I do not add in mine is the nuts.

Cake:
Vegetable oil spray for misting the pan
1 package (18.25-ounce) plain yellow cake mix
1 cup sour cream
3/4 cup vegetable oil
4 large eggs

Filling:
1/3 cup honey
1/3 cup packed light brown sugar
2 tablespoons ground cinnamon
1/2 cup finely chopped pecans (optional)

Sugar glaze:
2 cups confectioners' sugar, sifted
1/3 cup milk
1 teaspoon pure vanilla extract

Place a rack in the center of the oven and preheat the oven to 350 degrees. Lightly mist a 9- by 13-inch baking pan with vegetable oil spray. Set the pan aside.

Place the cake mix, sour cream, oil and eggs in a large mixing bowl. Blend with an electric mixer on low speed for 1 minute. Stop the machine and scrape down the sides of the bowl with a spatula. Increase the mixer speed to medium and beat 2 minutes more, scraping the sides down again if needed. The batter should look thick and well blended. Pour the batter into the prepared pan, smoothing it out with the spatula.

Add the filling. Drizzle the honey on top of the batter, then sprinkle on the brown sugar, cinnamon and pecans, if desired. With a dinner knife, swirl through these ingredients to blend slightly. Place the pan in the oven.

Bake the cake until is it golden brown and springs back when lightly pressed with your finger, 38 to 40 minutes.

For the glaze, place the confectioners' sugar, milk and vanilla in a small mixing bowl and stir until the mixture is well combined. Pour the glaze over the top of the hot cake in the pan, spreading it to the sides with a spoon. Allow the cake to cool for 20 minutes more before cutting it into squares and serving warm.

Note: Store this cake, covered in plastic wrap, at room temperature for up to 1 week. Or freeze it, wrapped in aluminum foil, for up to six months. Thaw the cake overnight on the counter before serving.

Source: The Cake Mix Doctor by Anne Byrn (Workman Publishing, 1999)